Alert Sign watches your calendar in the background and keeps track of your upcoming appointments, meetings, and reminders.
When an event is approaching, Alert Sign displays a highly visible notification designed to grab your attention and help you stay on schedule.
You choose how much notice you want before an event starts. Whether that’s one minute, five minutes, or more, Alert Sign helps ensure important meetings don’t get missed while you’re focused on work.
- Alert Sign Premium unlocks unlimited alerts, priority support, and application updates.
The Premium subscription can be activated via the downloaded app.
If you purchased a subscription through the Apple App Store, your Premium access should activate automatically when you sign in using the same Apple account used during purchase.
If your Premium subscription does not activate correctly, contact Apple App Store support and they’ll manage your request directly:
To unlock the Premium features.
Once installed,
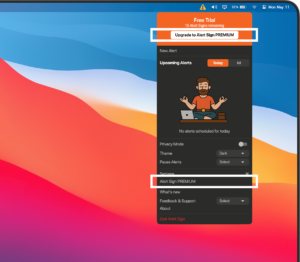
- Click on the Alert Sign Application menu bar icon
- Then, in the top of the Alert Sign application dropdown menu, select & click “Upgrade to Alert Sign PREMIUM“
- or: select & click mid way down the application Menu Banner “Alert Sign PREMIUM“
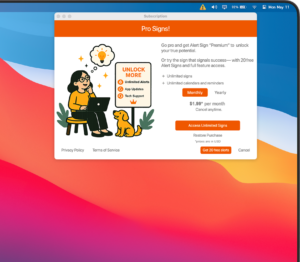
- The in the next window, select & click your preferred subscription period:
- Monthly
- Yearly
- Click: “Access Unlimited Signs“
Alert Sign is compatible with the following video conferencing platforms:
- Amazon Chime
- Apple FaceTime
- Arond
- BlueJeans
- Cisco Webex
- Doxy.me
- Entre
- Google Meet
- GoTo Meeting
- GoTo Webinar
- Jitsi Meet
- Join.me
- Meta Workplace
- Microsoft Teams
- Microsoft Teams for Government
- RingCentral
- Riverside
- Roam
- Signal
- Skype
- Slack Huddles
- TeamSpeak
- Tuple
- Webex for Government
- Whereby
- YouCanBookMe
- Zoom
- Zoom for Government
If a service is missing, contact support and we’ll do our best to have it added.
Alert Sign works alongside Apple Calendar (iCal) to monitor your upcoming meetings, appointments, and reminders. For Alert Sign to detect new or updated events, Apple Calendar must remain running in the background. Don’t worry—you can minimise or hide Calendar and continue working normally while Alert Sign keeps you informed.
If you cannot see the Alert Sign icon in your menu bar:
- MacBooks with a Display Notch
- Depending on how many applications you have listed in the MacOS Menu Bar, some icons may be hidden when space becomes limited.
- You may need to hide some of the applications in the menu bar to allow “Alert Sign” app to move to the right of the app list so it’s visible.
- Read more at this link:
- MacOS Settings for Menu Bar
- Open MacOS System Settings and verify “Alert Sign” is enabled within Menu Bar settings.
- Navigate to Menu Bar and find “Alert Sign” in the “Allow in the Menu Bar” applications list.
- Switch the toggle next to “Alert Sign” to enabled.
- Read more at this link:
Alert Sign displays information from the MacOS (iCal) calendar app, made available to the application as part of your initial Alert Sign set-up process
Alert Sign automatically synchs to your Apple Calendar (iCal) calendar regularly. Generally around every 15 to 30 seconds.
If events appear to be missing:
- Confirm the event appears in your Apple Calendar (iCal) calendar application.
- Verify your calendar account is synchronising correctly.
- Refresh your connected calendar account.
- Reconnect your Google, Microsoft, Yahoo or other supported calendar service in your Apple Calendar (iCal) calendar if necessary.
- You can force Alert Sign to re-synch with your calendar by quitting the app and restarting it.
Alert Sign works with your calendars connected through MacOS Calendar (iCal).
To add a new calendar:
- Open the MacOS (iCal) Calendar application.
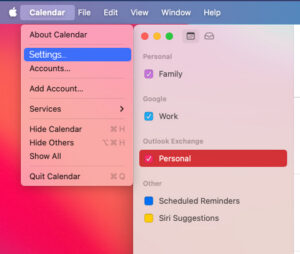
- Open Calendar Settings (Menu bar > Calendar > Settings > Accounts)
- Select Accounts.
- Add a new account by clicking the “+” button on the bottom left of the “Accounts” window
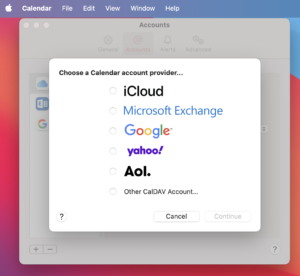
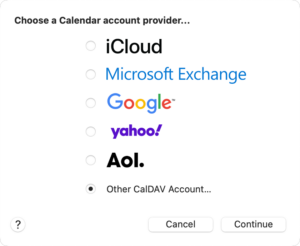
- Select from the list Calendar Account Providers in the pop-up window
- Sign in to your calendar provider.
- Select the calendar refresh frequency.
- The higher the refresh frequencies ensure your calendar and Alert Sign are kept up to date more frequently
- Confirm your calendar provider is now shown in the Calendar app
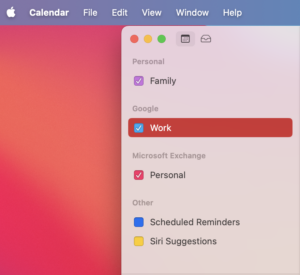
- Confirm events appear in MacOS (iCal) Calendar.
Once the calendar is available, Alert Sign can use it for notifications and reminders.
Alert Sign relies on Apple Calendar (iCal) connections to display events.
If Apple does not support the 3rd party calendar, it will not be available to the Alert Sign application.
Apple and Apple’s supported 3rd party calendars only.
If the calendar vendor does not appear in the list managed by Apple, or is not supported by Apple’s 3rd party integration via “Other CalDAV Account” set-up, Alert Sign will not be able to connect to the calendar.
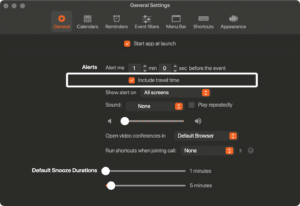
Alert Sign can notify you when it’s time to leave for an appointment.
If your calendar event includes a location and travel duration, Alert Sign can factor that Travel Time into its notification schedule.
Example:
- Meeting starts at 3:00 PM
- Travel Time is 30 minutes
- Alert Sign reminder is configured for 1 minute before departure
You would receive your alert at approximately 2:29 PM, helping ensure you arrive on time.
Enable Travel Time Notifications within Alert Sign Settings.
If Premium features are no longer available:
- Confirm you’re signed in with the same Apple App Store account used during purchase.
- Check that your subscription remains active.
- Verify your internet connection is working correctly.
- Disable VPNs, proxy services, firewall restrictions, or connection-blocking software temporarily and try again.
In some situations, network restrictions can prevent subscription validation from completing successfully.
If the issue continues, contact Apple Subscription Support and include details about your subscription and device.